Behind the Code: Designing Raz's Jump

Devin Kelly-Sneed has been at Double Fine since 2016 and he's one hell of a programmer. Some of you might remember his Amnesia Fortnight project from 2017, Darwin's Dinner. For Psychonauts 2, Devin acted as the Player Movement and Powers Feature Lead, helping to make sure that Raz leapt with acrobatic grace and blasted bad thoughts with flashy flair. He's kindly written outlines on the implementation of a few features. Today, we're gonna have him guide us through the design of Raz's jump.
Jumping is one of the most important player actions in Psychonauts 2. You need it to reach higher ground and cross perilous gaps. You use it to grab floating collectibles and avoid enemy attacks. And often you use it just to have more fun as you run around - boing boing boing!
While "jump" may seem like a fairly simple concept, there was actually a huge amount of work by a cross-discipline group of people to get to the version of jump that shipped. This article will talk about some of the design and implementation details for Raz’s jump in Psychonauts 2 and hopefully give you a sense of the types of work involved in developing a major gameplay feature.
The Jump Arc
We wanted the jump to feel responsive, reach a specific height and distance, and allow enough air control for the player to land precisely where they intend to. We achieved this with a quick launch, having the peak of the jump be a bit floaty, allowing steering while in the air, then dropping sharply toward the ground.
We don’t need to get into a lot of math detail, but it’s worth briefly thinking about the equation for maximum height for an object launched upward at velocity V. The important thing to understand is that increasing the launch velocity increases the jump height, and increasing the gravity will decrease the jump height.
MaxHeight = V^2 / (2*Gravity)
We want Raz’s jump to reach a specific height that corresponds to the obstacles we place into levels. By tuning the Gravity and Launch Velocity we can achieve the same height with drastically different jump arcs - slow and floaty or a very quick launch and fall.
But neither of these feels very good. The slow one feels very floaty and sluggish. The quick one can’t cover much distance and gives too little time to make any steering adjustments. You can choose one somewhere in the middle, but that still doesn’t achieve the feel and distance/height we wanted.
To define our jump arc we designed a system that breaks the motion into phases which can each be tuned independently. Each phase has settings for things like Launch Velocity, Gravity, and Duration. This allowed us to have the jump rise quickly (responsive), float for a bit (cover ground and aim for your landing), and then drop down (land where you intend to). We also allow the player to control the size of the jump based on how long they hold the Jump button.
To achieve the quick launch we start with a high launch velocity. We keep this phase from getting Raz too high by pairing it with a high gravity. This phase is tuned to end once Raz’s vertical speed is approaching zero.
The next two phases are tuned with a low gravity so that Raz will stay at about the same height for quite a while. These are each tuned to end after a specific duration.
And finally we briefly increase gravity to achieve the quick drop before ending the jump and returning to default gravity.
We allow the first two phases to end early (with a minimum duration) if the jump button is released, resulting in smaller jumps.

Jumping holding button (left), and releasing button (right).
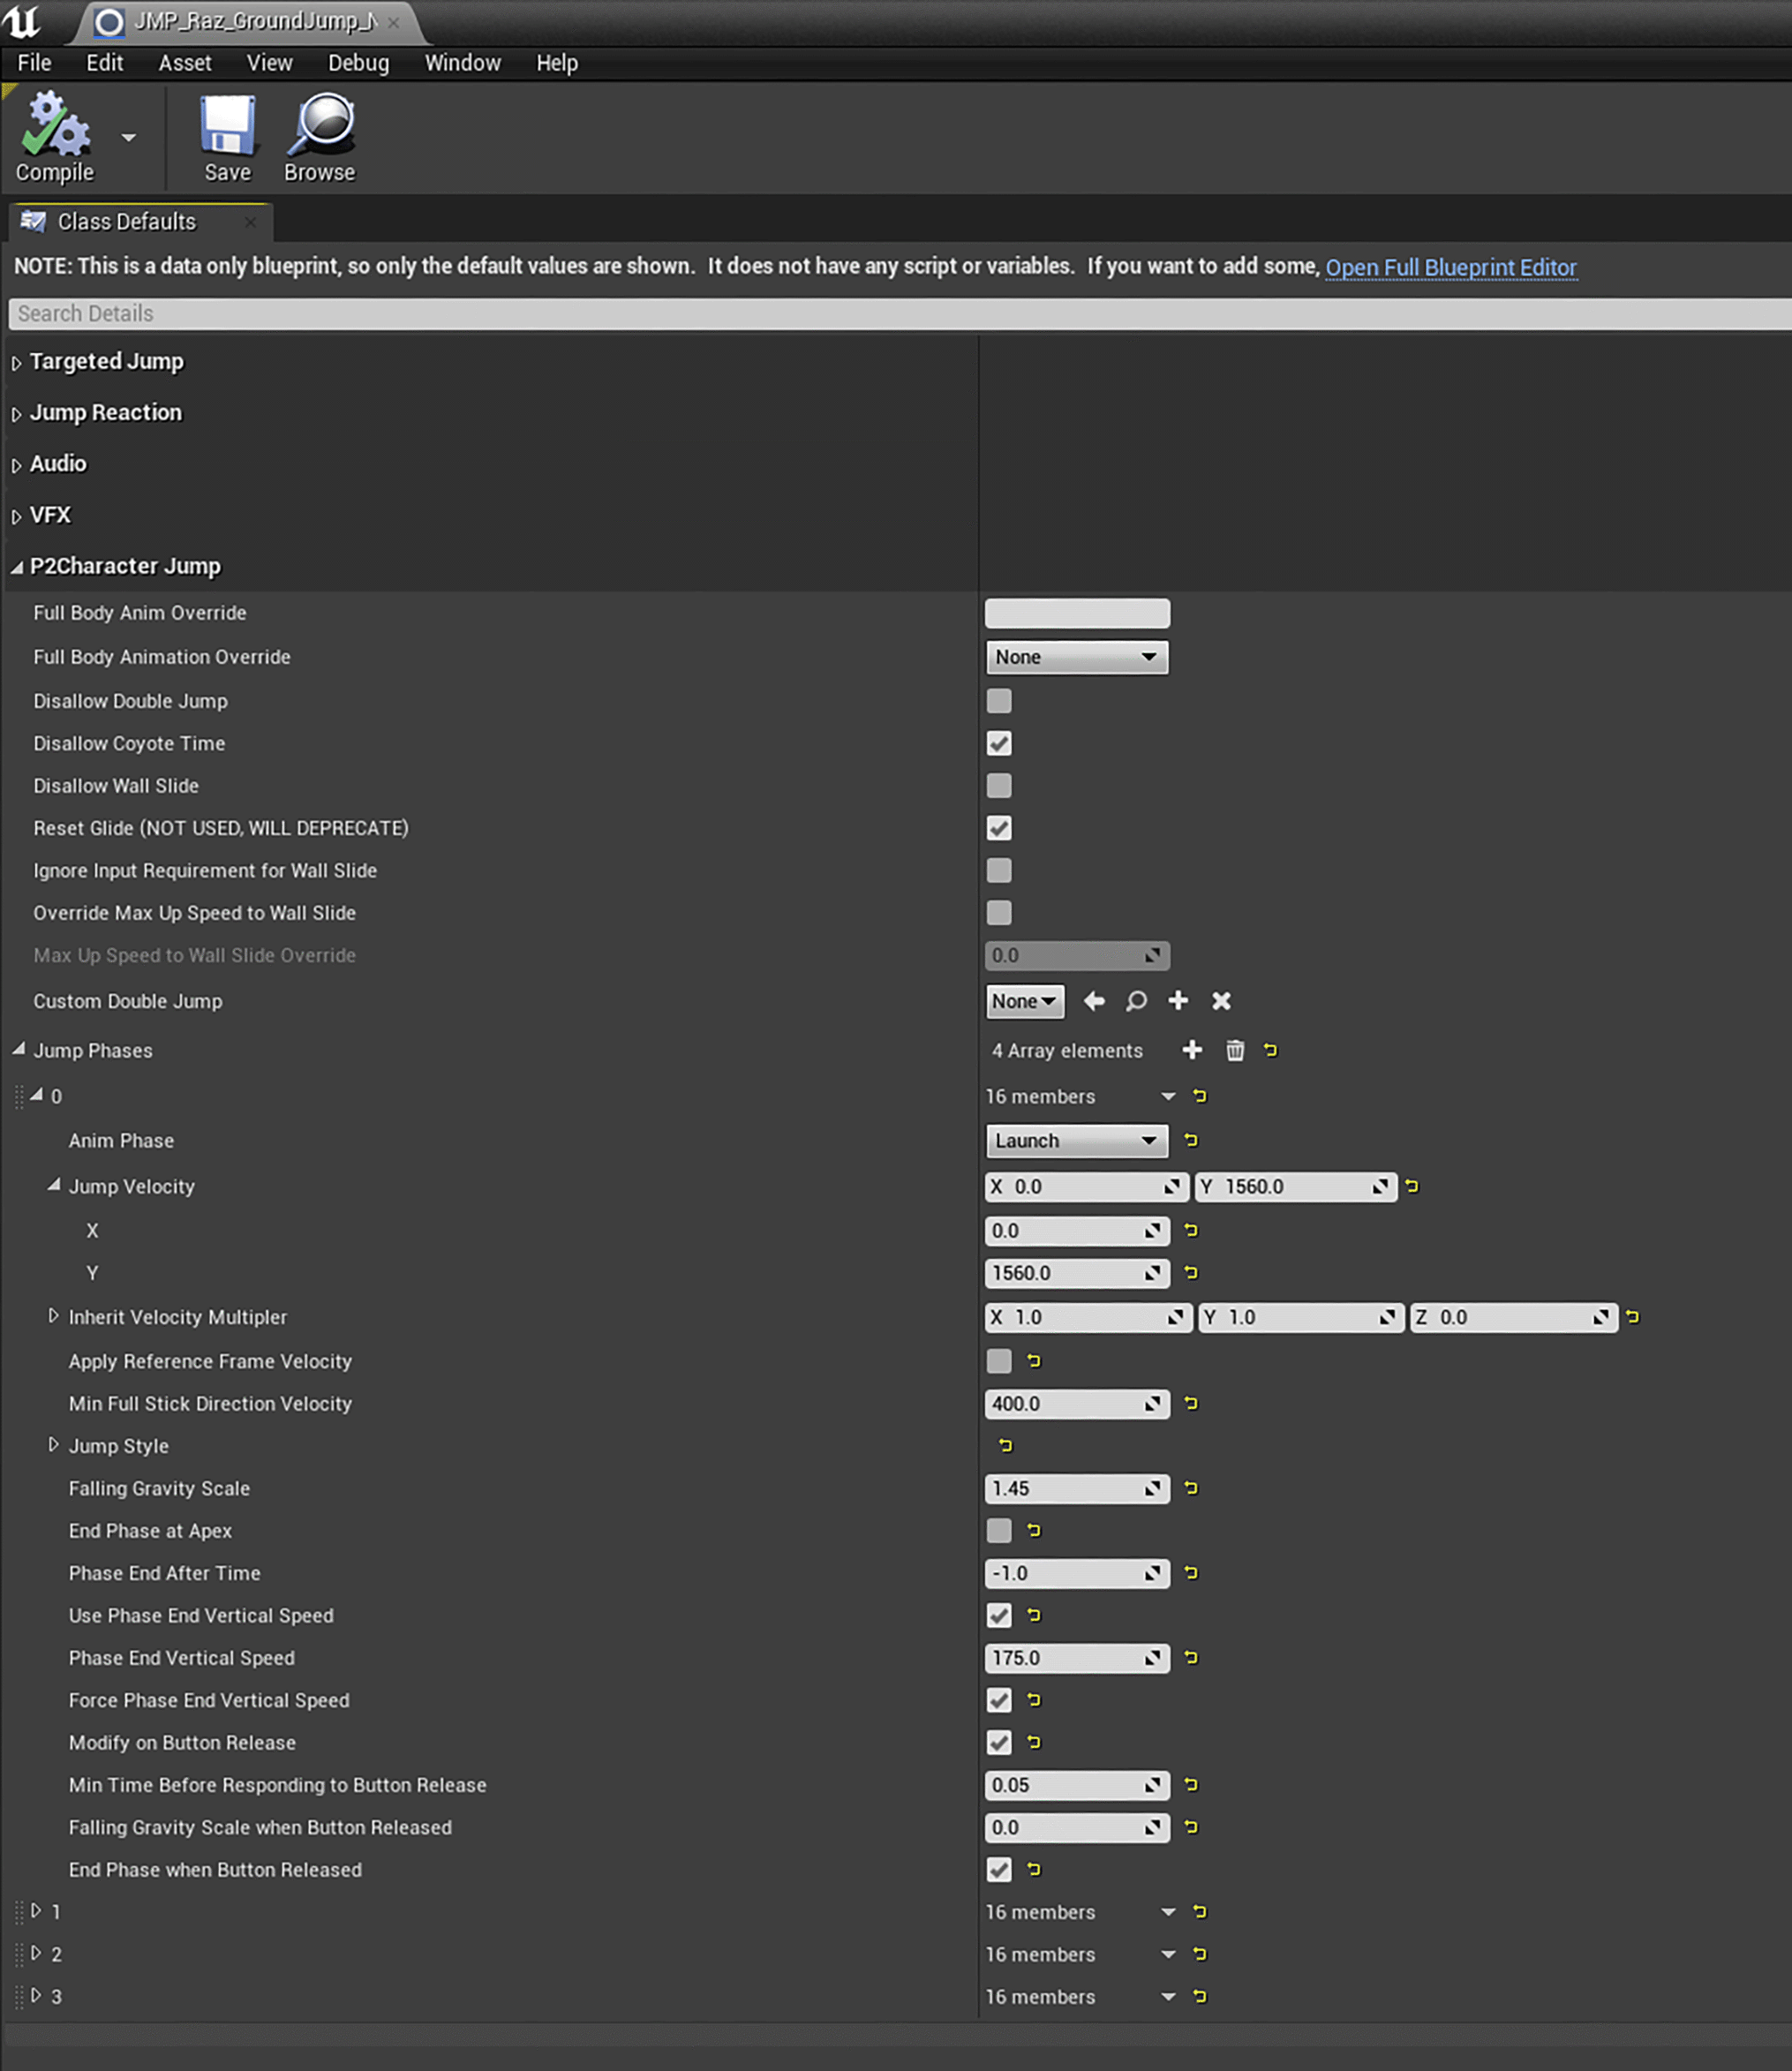
For reference, here are the approximate values we shipped with. Velocities are in cm/sec. Gravity % is a multiplier on the default gravity. Raz is around 125cm tall.
| Phase | Launch | Gravity Multiplier | End Time | End Vertical Speed | Duration if button released |
|---|---|---|---|---|---|
| Phase Launch | Launch 1560.0 up | Gravity Multiplier 1.45 | End Time - | End Vertical Speed 175.0 up | Duration if button released 0.05s |
| Phase Float A | Launch - | Gravity Multiplier 0.26 | End Time 0.32s | End Vertical Speed - | Duration if button released 0.09s |
| Phase Float B | Launch - | Gravity Multiplier 0.26 | End Time 0.08s | End Vertical Speed - | Duration if button released - |
| Phase Fall | Launch - | Gravity Multiplier 1.50 | End Time 0.08s | End Vertical Speed - | Duration if button released - |
Animation
The animation for Raz’s ground jump is divided into three animation sequences which are associated with the phases of the jump: Launch, Float, Fall. For our four-phased ground jump, the middle two phases were both tagged as Float for animation purposes.
We had several variations so the jump doesn’t look the same every single time.
VFX and Audio
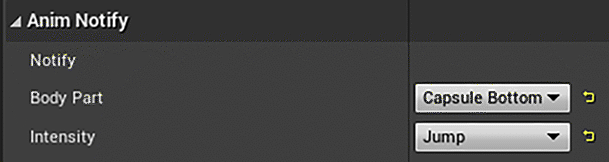
We triggered most audio and particle effects through animation notifies. Here’s an example of the animation for starting a ground jump.

The AkEvent notify is for triggering a sound effect. PlayDialogSet triggers Raz’s jump voice line (“hup!”). The Footstep/Handplant notify sends an event to a system that can trigger audio and vfx based on the event and surface type. Here are the settings for a Jump event at the bottom of the character’s capsule collision.
Here you can see the different launch vfx for two different ground surface types: dirt and honey.
Metrics
Early on in the project we spent some time deciding on the jump metrics. This is a set of measurements that can be used for level design. How high is a jump? How far can you get if you double jump? By codifying these values we enable level designers to build content that will fit the desired platforming experience. For example, they can make a jump covered by a single jump on an easy path, and a gap that requires a double jump on a more challenging path.
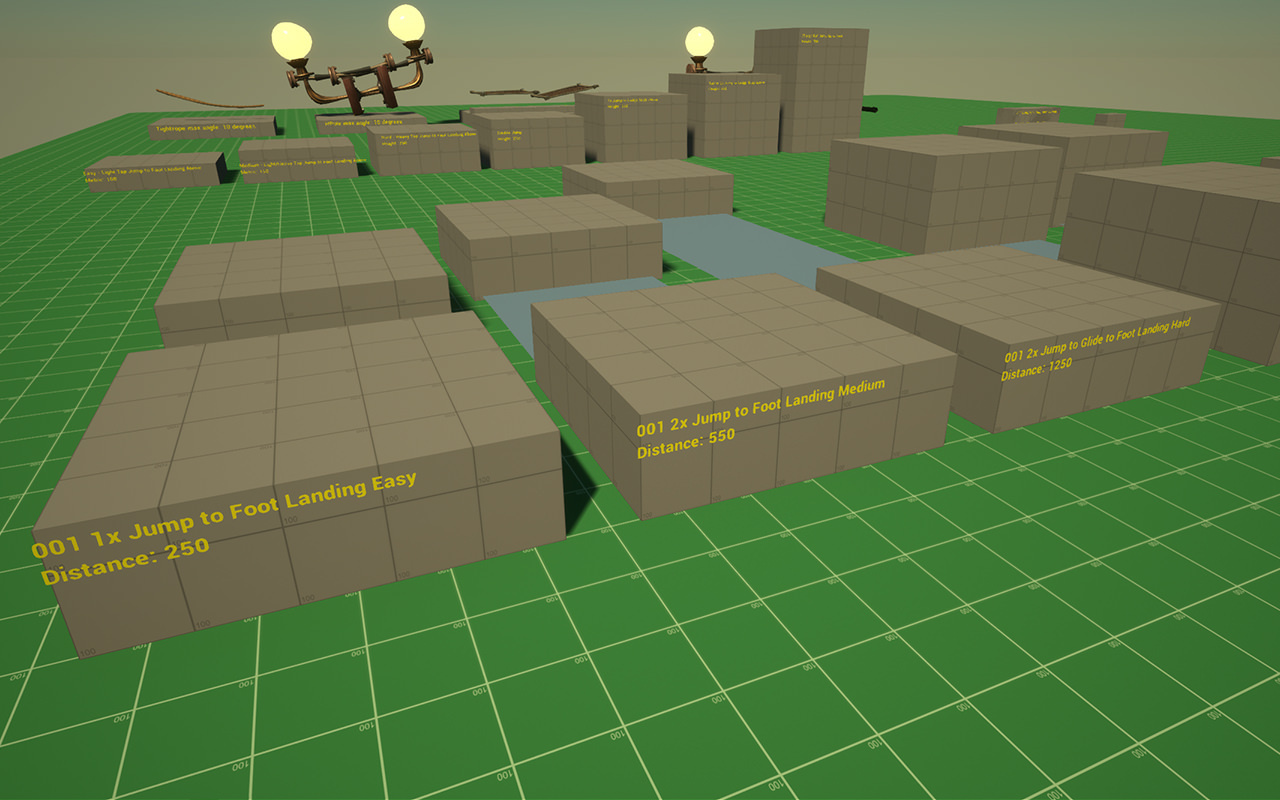
As production went on, we sometimes ran across situations that resulted in us wanting to adjust or add metrics. Adding moves that allowed Raz to jump higher or further meant that previous understanding of what is possible could be invalidated. This type of change had to be made very carefully to avoid requiring too many layout changes in levels.
Visualization features
We had several tools available for visualizing jumps. Each served a different purpose.
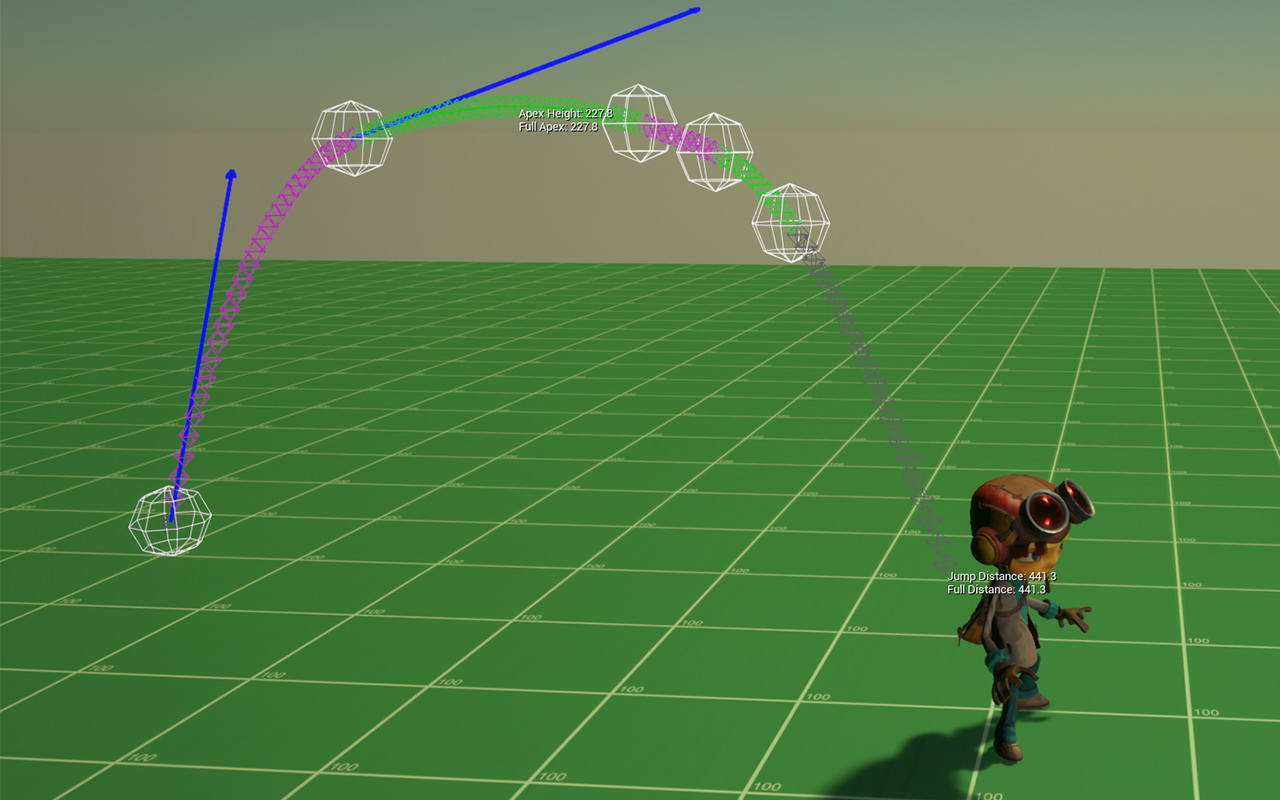
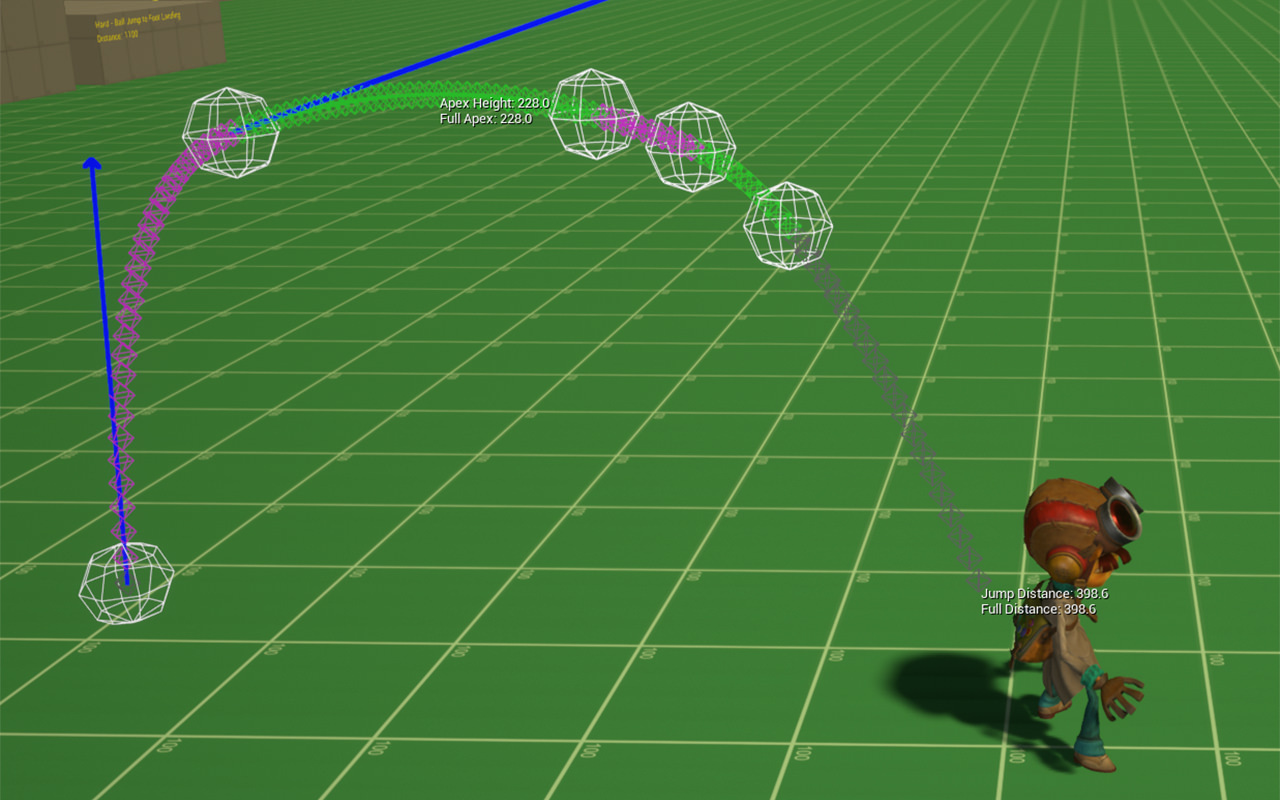
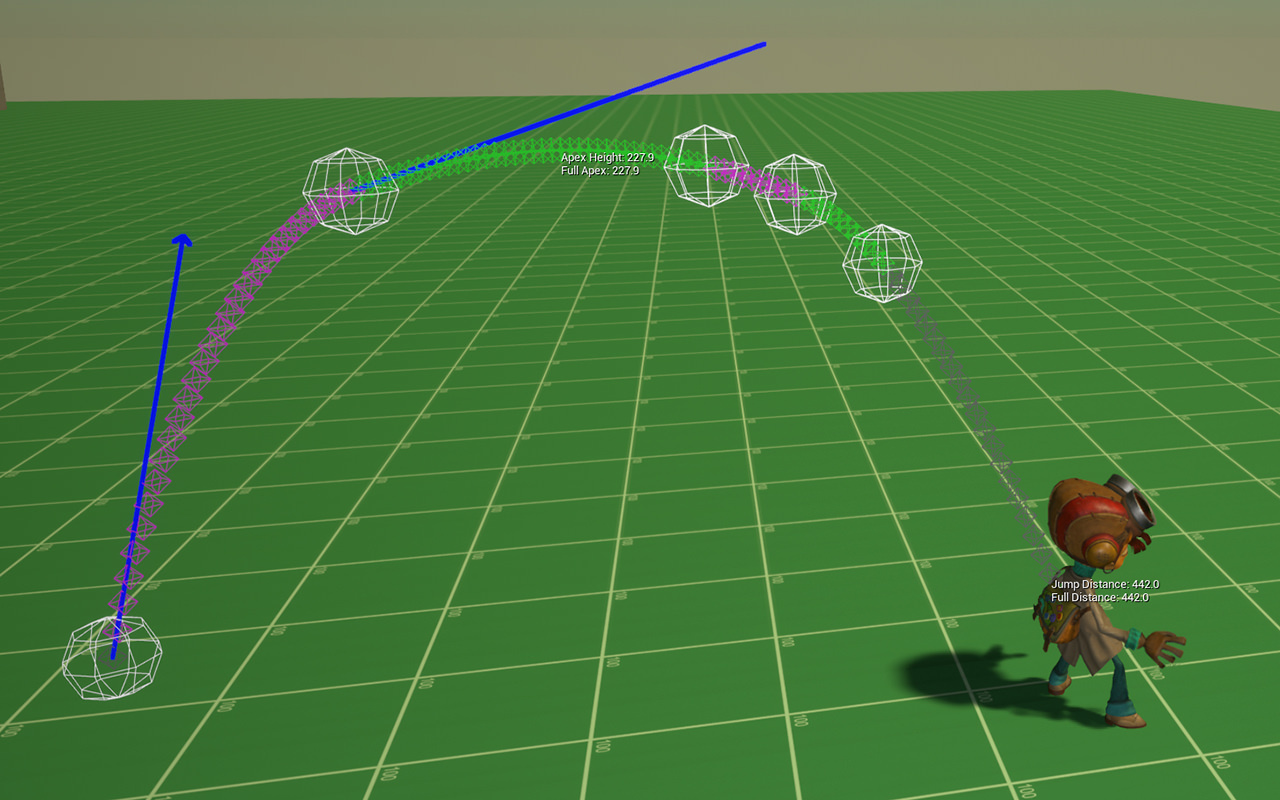
Active Jump Debug Draw
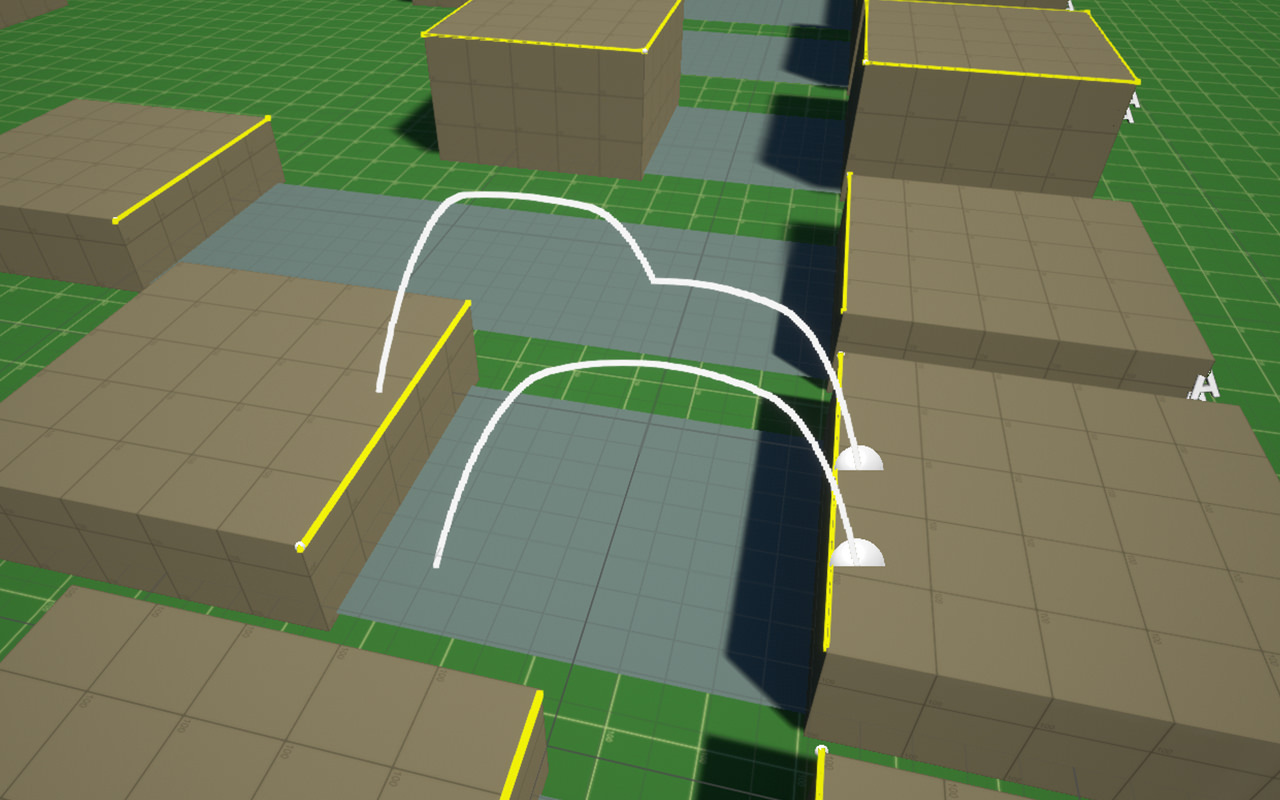
This allows us to see what happened on a particular jump. The shape of the arc phases, the apex height, and the distance covered. This is useful for examining how a jump behaved in a particular context during gameplay. The trail alternates between magenta and green at each phase change. The trail becomes gray once the jump phases are complete and we return to the default gravity. Text drawn at the apex and landing is useful for checking the height and distance of the jump.
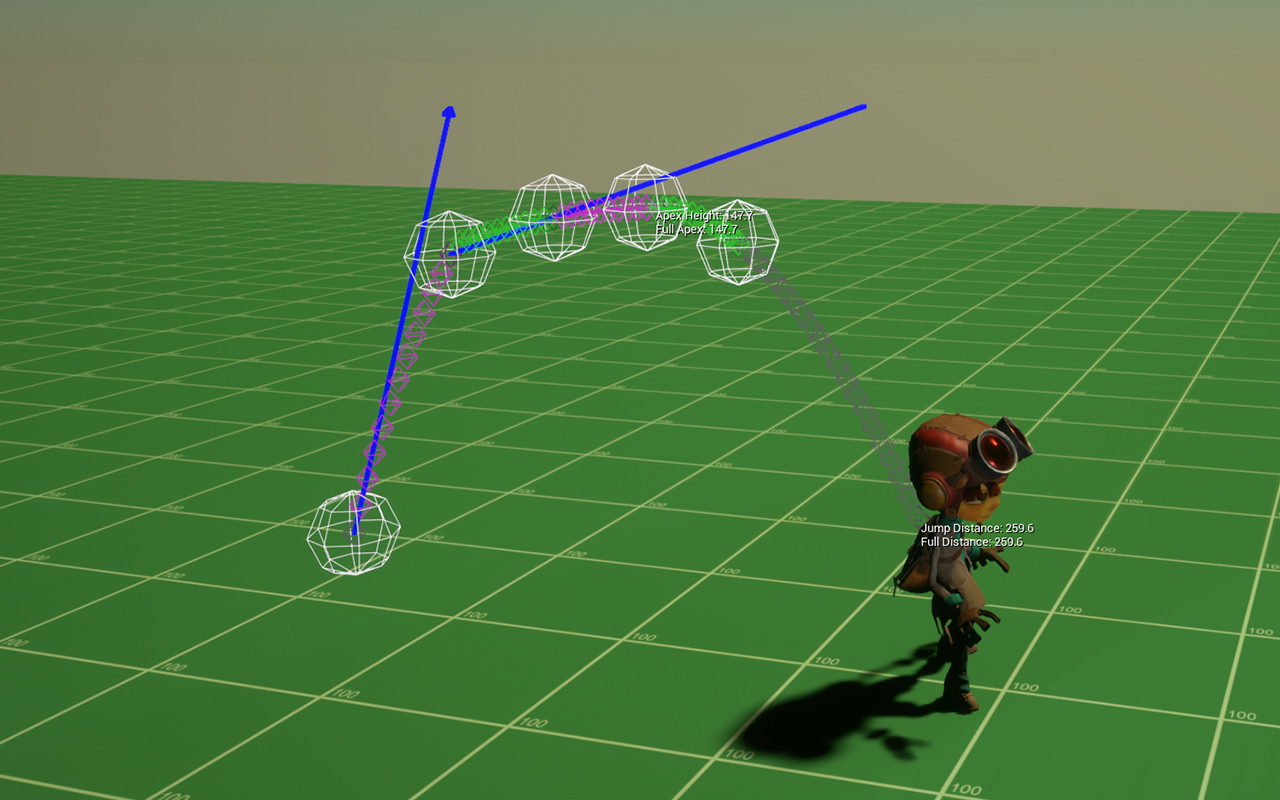
Jump Sim Preview
This allows us to preview the jump before hitting the button. This was useful when tuning various jumps to see the arc shape in the context of a level. This was also useful for visualizing the jump arc while tuning the values.
Jump Metrics Tool
The jump metrics tool is designed to be placed into the level when the game is not running to visualize Raz’s jump arc. This can be used to help place objects along an action path so they’ll be reachable by the intended jump type. The tool runs the jump simulation code at edit time, while the game is not running. Any changes to the jump tuning would be reflected by the preview arc.
In this image you can see two jump previews: one showing the single jump, the other showing a double jump.
Jump Assets
Raz doesn’t just have one jump. We actually had a huge variety of jumps for different situations. I’ve mostly written about the default ground jump - what happens when you hit the jump button while standing or running. But Raz also has the ability to jump off of and on to a bunch of objects in the world.
Psychonauts 2 shipped with approximately 80 jump assets, each tuned for a different use case. A handful of these were used by enemy characters (e.g. for leap attack motion). But the vast majority were for Raz. How can Raz need so many jumps? Here’s a sampling of them:
- Ground jump
- Jump off horizontal pole
- Jump off vertical pole
- Bounce on trampoline
- Jump on levitation ball
- Charged jump on levitation ball
- Water curse bounce
- Jump sideways during wall climb
- Jump backwards off wall climb
- Dismount Big Ball
- Bounce off an enemy’s head
- Leap attack
- Ground pound attack
Some of these ended up with similar or even identical tuning to each other, but having the flexibility to decide exactly how each jump worked without changing others was very useful.
Here’s a look at a jump asset in editor. This is the default ground jump. As you can see, there are a lot of settings available that allow fine tuning the behavior. The motion is tuned in the Jump Phases section. The first phase is shown here, the others have all of the same properties available for tuning.
Tuning with MIDI Controllers
There are a lot of variables that go into getting the desired arc shape. And you often want to tweak a couple of them at the same time (e.g. launch velocity and gravity). To make this process easier we sometimes hooked up a MIDI controller to the tuning properties and adjusted them by turning knobs instead of typing in values. This allows for much faster iteration when paired with the Jump Sim Preview. It’s also a lot more intuitive to see the arc while tuning than just inputting a bunch of numbers and then testing it out.
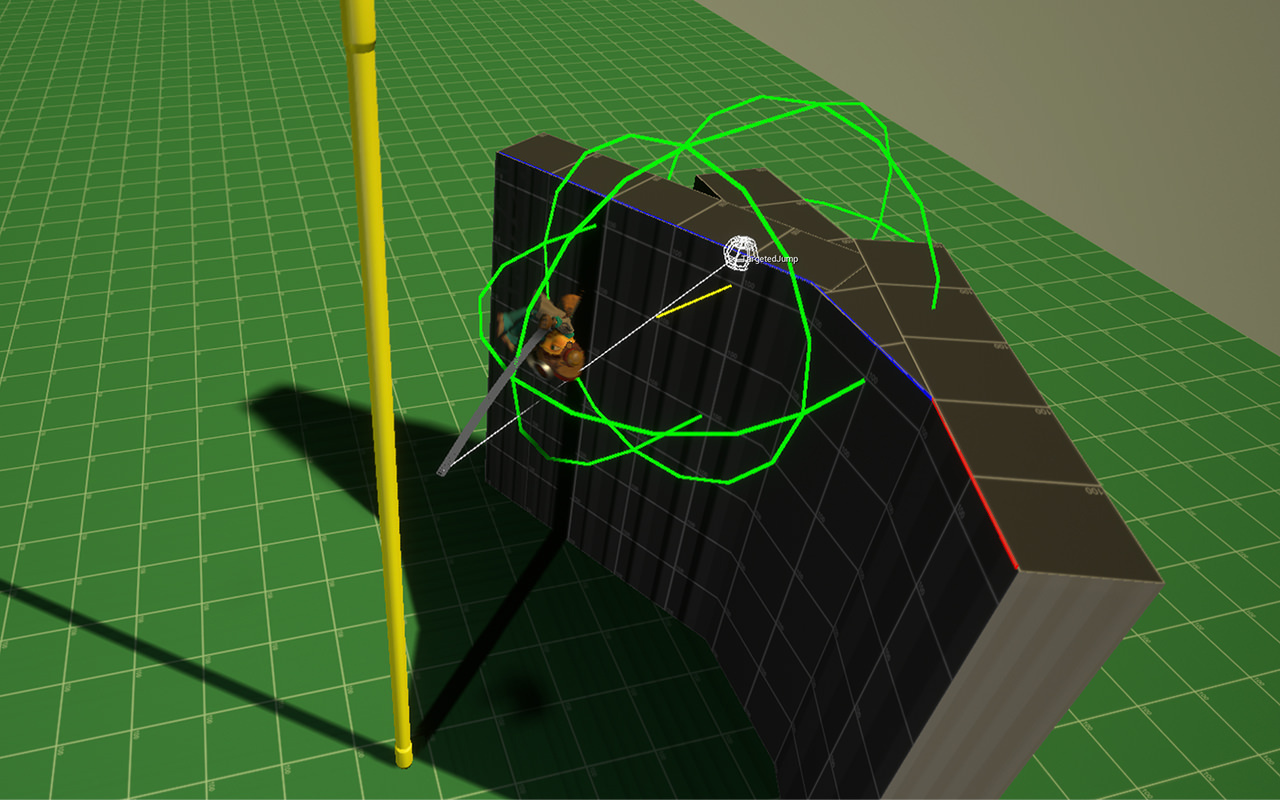
Targeted Jumps
Some jumps in Psychonauts 2 are designed to arrive at a specific target automatically. An example is when jumping from one pole to another. Targeted jumps were used to force a consistent arc and arrival location. The common use case for this was jumping off of something like a pole. When the player hits jump we do a search in a predefined region to see if there are any things for Raz to attach to (e.g. another pole or ledge). If found, we bypass all the normal jump logic, calculate a simple parabolic arc to reach the destination, and briefly disable the player’s air steering.
This allowed for more forgiving layout metrics and made certain types of platforming more consistent for players.
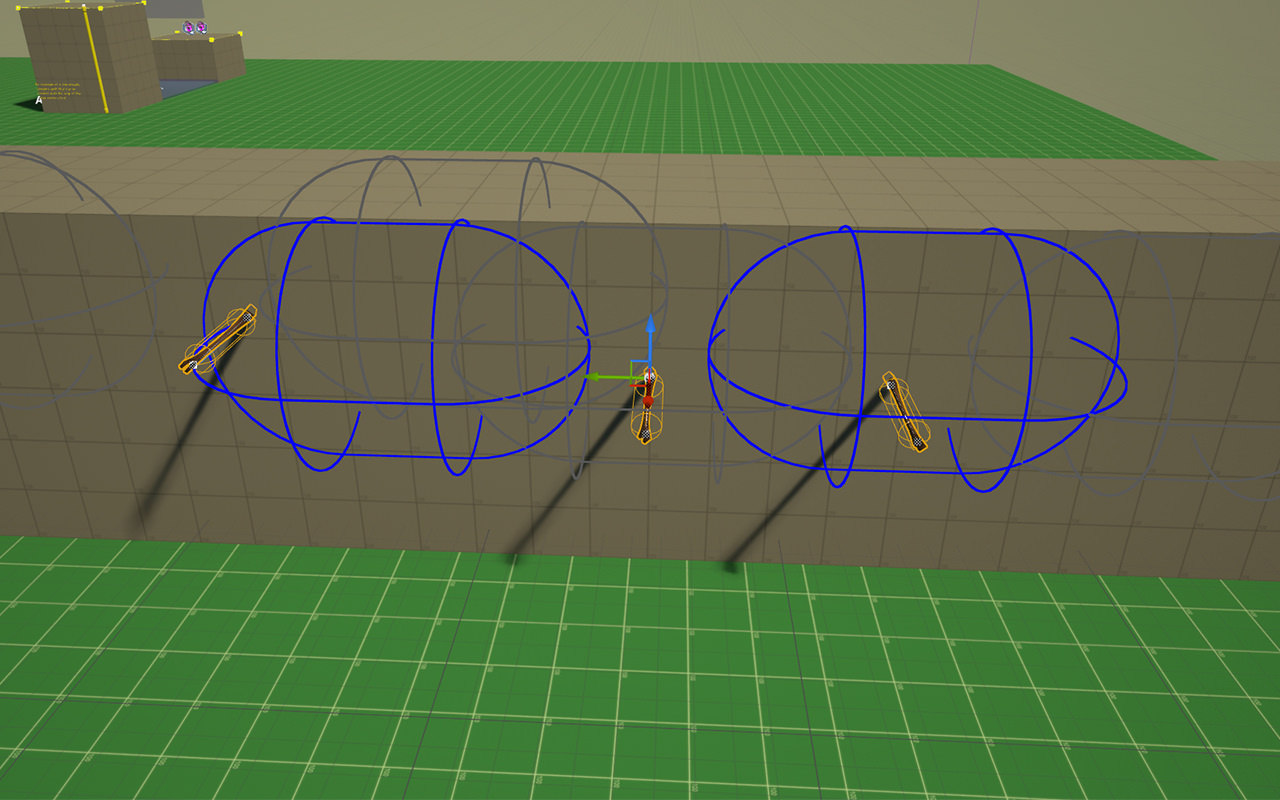
We authored these target detectors as capsule components attached to Raz, though for performance reasons they aren’t actually attached or enabled in the physics simulation at runtime. Updating the location and recalculating overlaps on these every frame was too costly. We cache off their relative transform and do overlap queries when needed.
When picking the best target for a targeted jump we considered both the distance to the target as well as the angle away from Raz’s forward vector. The main case this mattered was when jumping to a ledge, which is made up of multiple segments. We calculated a score for each possible segment to decide which one Raz should jump to. In this image the blue segments were determined to be potential attach points. The red segment was discarded as being outside the green capsule’s target area. The white sphere represents the chosen target point.
Polishing the Edges
Over the course of the project we identified a huge number of rough edges that needed polish to feel reliably good. Some were things we anticipated at the start, others were discovered through testing. Here are a handful of little features that help make the jumps feel better.
Perspective Issues
One interesting feature is the detector we used for jumping up to a pole. We found that it was often difficult to judge depth and players might think they were directly under a pole when they are not quite to it or just past it.
To make jumping up to a pole from below feel more reliable we orient the pole detector based on the camera. This means that when the camera orientation makes it more difficult to line up under the pole we are more generous with detecting and attaching.
Jumping Forward From a Standstill
The horizontal motion of our ground jump is based on your running movement. However we found that sometimes players would carefully walk to the edge of a gap and stop before pushing forward and trying to jump across. Because it takes time to accelerate up to the run speed, they would start their jump with too low of a horizontal velocity to clear the gap.
Jump from standstill without assist (left), and with assist (right).
To solve this we bypass the normal acceleration if the player is fully pushing the movement stick when they jump and instead immediately set the horizontal velocity to about 80% of maximum run speed. This made the “creep up to the ledge” approach work reliably. The difference is subtle, but made a positive impact on game feel for one style of player.
Coyote Time
Like most platformers, Psychonauts 2 allows the player to jump just after they begin falling when running off an edge. This behavior is often named “Coyote Time,” after the way the cartoon character Wile E. Coyote briefly stays in the air after running off a cliff. This makes the controls feel more forgiving. If you just started falling and hit Jump you will perform the jump associated with the previous movement mode (e.g walking, railslide, levitation, etc.) rather than using the aerial jump (aka double jump).
Our implementation actually allowed for more than just jumps. When a movement mode ends it can specify some Coyote Data. This data included a duration, minimum speed to activate, and actions to do if the player hits Jump, Attack, or Dodge. When we received a button input we checked to see if there was recent Coyote Data configured to consume that input before the current mode gets a chance to react to it.
We also optionally did a “pre-jump” which generally just lowered the gravity very briefly. This meant that Raz would not fall as quickly when running off a ledge and your Coyote Time jump would start at roughly the same height as if you had jumped before running off. For reference, Raz’s ground (normal running movement) coyote time was 0.2 seconds long, with 0.15 seconds at 25% gravity. The pre-jump that set the gravity to 25% was implemented as a Jump that was triggered automatically when we entered the falling movement mode.
Rail Follow Jump
When sliding on a rail we wanted a jump to follow the path of the rail so you wouldn’t fall off jumping near a curve. To accomplish this we run the jump logic but don’t let it drive Raz directly. This was an important use case for having the system operate on the JumpState structure instead of on the character. It allowed us to run all the jump logic without directly impacting Raz’s movement. We take the vertical component of the simulated jump and use it as an offset above the rail, adjusting Raz’s horizontal velocity to follow the rail spline’s curve.
System Architecture
Psychonauts 2 was built using Unreal Engine 4. Most of the character motion logic is running through UCharacterMovementComponent, a standard part of Unreal. We built our own movement mode system on top of it. But at the end of the day the jump motion is running the built in PhysFalling() function with some minor modifications. We inserted a function that lets us run our jump update logic just before PhysFalling moves the capsule. We also made a bunch of small changes to support arbitrary gravity direction and associated collision capsule orientation.
Our custom jump logic was mainly adjusting the gravity strength based on the jump phase and determining when to move to the next phase based on the current state.
To support the various jump simulations we needed to be able to run the jump logic without the character actually doing the jump. And in the case of the editor sim, we didn’t even have an instance of the character around at all. All the jump functions are written to operate on a struct called P2JumpState. It contains the location, orientation, gravity, time, jump button state, and about thirty other properties to handle all sorts of specific behaviors. At runtime it also contains a reference to the actual character, allowing relevant properties like current gravity to be copied from the P2JumpState to the character. But we were able to run all of the logic without impacting the character when desired.
Here’s an example of the functions on the Jump State that allowed the simulation to operate whether or not we were actually driving the character’s movement.
Any jump logic that cared about the current velocity would use this function rather than accessing the velocity directly on the character. For example:
Wrap Up
Even something as seemingly simple as jumping can end up with a huge amount of complexity when it’s such a core part of the game experience. It was a lot of effort by multiple people to create the version that shipped. We hope you’ve enjoyed learning a bit about the design, systems, and process behind Raz’s Jump!


